Today we are announcing the release of a front end regression testing tool called Wraith. This tool is something we have been using for the last 6 months, it has proven invaluable in testing CSS changes, both deliberate and unintentional.
Download Wraith here : https://github.com/BBC-News/wraith
This tool came about as we continued to see small changes from release to release, as more teams joined the project, small front end bugs cropped up more frequently. Our solution was to compare screenshots of pages, at the pull request level and when merged into master. This process produces fewer bugs and unintended changes, while also being able to ensure intentional changes appear correctly.
How it works
The tool is 2 parts, the capturing, using a headless browser and the comparing, using Imagemagick. PhantomJS is a headless browser designed exactly for these types of tasks. It doesn't have a UI, all your settings are applied on the command line, or in our case, in snap.js. We can use PhantomJS to capture multiple resolutions, so RWD testing is made much easier. An alternative is SlimerJS, this is another headless browser. It is not out of the box headless on some operating systems, so is not as simple to setup as PhantomJS. The good thing is that it is essentially a clone of PhantomJS, so all settings will work with both browsers.
The main difference between the two browsers is webkit and Gecko, PhantomJS being Webkit and SlimerJS being Gecko. This means that you can test across two rendering engines. By default, we have set up Wraith to use PhantomJS, this is due to the extra configuration to make Slimer headless.
Using Wraith, you can see where your website really breaks by starting to put in resolutions you don't normally consider. Each screenshot has it's file name comprised of the resolution and the environment you're grabbing the screenshot from, the individual web pages will label the folder so all your screenshots will be grouped.
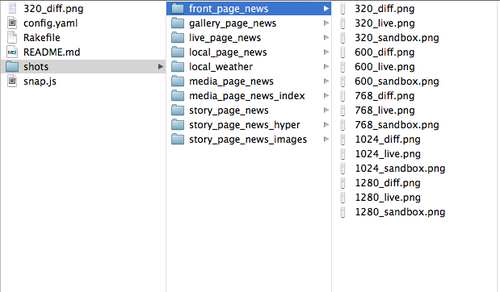
-All the screenshots in their folders
Wraith captures images from 2 domains, in most cases a live website and then a local or staging environment. This is where most of the other tools I looked didn't fit our needs, they used historical base line images instead of a live site. Not only does this not take into account other teams or external dependencies, it also assumes that you are using static data.
For News, that is not really possible, we use our sandboxes, test, stage and live environments for comparison. By using 2 domains, even if a dependency changes, e.g a twitter module, when you run the comparison, you will be using the latest version of the dependency. This wont flag up a change compared to a baseline with an old version of a twitter module that would. This may not be for those of you who are going to build a page and leave it for 6 months, but for a ever changing codebase like news, baseline images are out of date almost every day.
I've got the Magick...
Once the 2 images have been captured, they are then compared and a third diff image is output. The third image shows changes in blue, even 1px changes are shown, so the accuracy is excellent. For this process, we use Imagemagick.
Imagemagick is a very powerful tool for image work, so comparing images is a snap. We looked at other tools for comparing the images, but we found that there was an inherent problem with the way we were capturing images, anti-aliasing. Anti-aliasing caused changes to be shown where there were none, so our diff image wasn't that valuable. Imagemagick was our choice of tool because it takes care of the AA issue for you, but setting a fuzz of 20%, we were able to eliminate the AA differences. This setting was found by trial and error, so I suggest you fine tune this to your own preference. The fuzz parameter is set in the Rakefile.
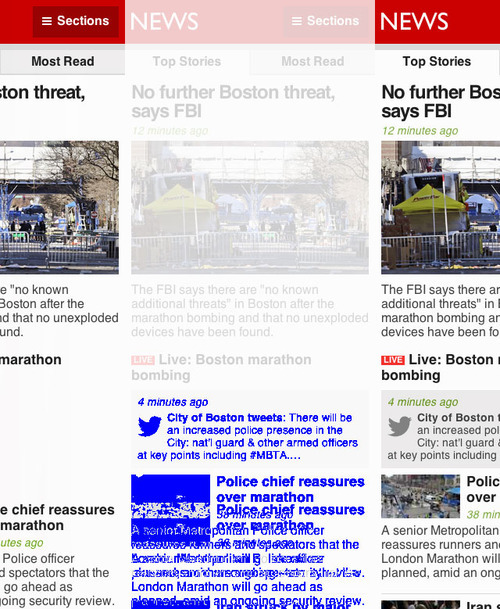
-Two pages with the diff result
Once we have the 3 images, we can start to review, this is simply a process of going through the diff images looking for lots of blue. If you don't like the blue colour, you can change it, but blue seems distinctive and should be easier to see on a white canvas. This is the only manual part of the process, but it is not something that takes that long. The total amount of time to capture the images and compare will be based on your Internet connection and the speed of your computer, but we usually capture 200 images and by the time we have our diffs, it has taken around 10 minutes.
Conclusion
The amount of time spent testing for CSS regressions can be lengthy if you don't automate, looking at devices and different browser resolutions can be a drag on testing. By using this tool, we have cut our testing time down dramatically, with fewer bugs making there way into master and the live site.